


Introduction
In this blog post, we will discuss how to install WordPress on your local machine. We will go through the installation process step-by-step and cover all the necessary settings in detail. If you want to follow along with the video tutorial, please refer to the transcript for instructions. Before we begin, make sure you have watched the introduction video where I mentioned the requirements for this course. If you haven’t watched it yet, I recommend you do so before proceeding, as it will help you understand everything more easily.
Step 1: Install XAMPP
The first step is to install XAMPP on your system. To do this, simply go to the official XAMPP website and download the latest version. Once downloaded, open the installer and follow the on-screen instructions. After the installation is complete, you will have XAMPP installed on your system.
Step 2: Start Apache and MySQL
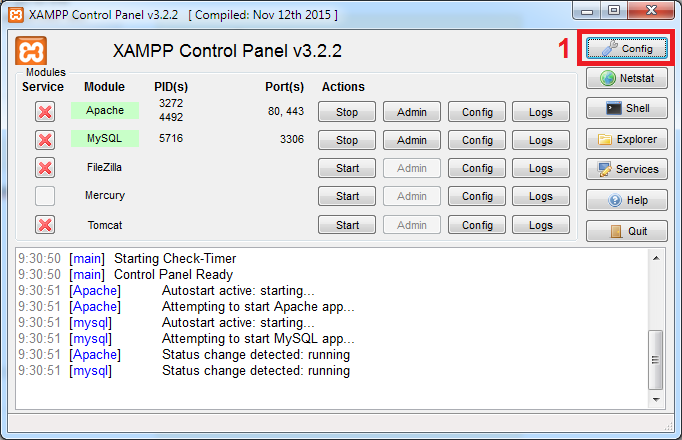
Now that we have XAMPP installed, we need to start the Apache and MySQL services. To do this, go to your system tray and find the XAMPP Control Panel. Open it and start Apache and MySQL from there. These services are required for running WordPress locally on your machine.
Step 3: Create the Database
The next step is to create a database where all the data for your website will be stored. To do this, open your favorite web browser and navigate to “localhost/phpmyadmin”. Once there, click on the “Databases” tab and enter a name for your database. You can choose any name you like, but I will use “wordpress” for this example. After entering the name, click on the “Create” button to create the database.
Step 4: Download and Extract WordPress
Now that we have our database ready, we can proceed to download and extract the WordPress files. To do this, go to the official WordPress website and click on the “Download” button. Once the download is complete, extract the files to the “htdocs” folder in your XAMPP installation directory. You can rename the extracted folder to anything you like, but for this example, I will use “wordpress”.
Step 5: Configure WordPress
After extracting the WordPress files, we need to configure it to work with our local setup. Open your web browser and enter “localhost/wordpress” in the address bar. This will open the WordPress installation page. Select your preferred language and click on the “Continue” button. On the next page, enter the following details:
- Site Title: Enter the name for your website here. You can choose anything you like, such as “Fresh Veggies Website”.
- Username: Enter a username for the admin account. You will use this username to log in to your WordPress dashboard.
- Password: Set a password for the admin account.
- Your Email: Enter your email address.
- Search Engine Visibility: It’s advisable not to check this box during the installation process, as it may affect search engine indexing.
Once you have entered all the details, click on the “Install WordPress” button to proceed. After a few seconds, WordPress will be installed on your local machine.
Step 6: Log in to WordPress
After the installation is complete, you can log in to your WordPress dashboard. To do this, go to “localhost/wordpress/wp-admin” in your web browser. Enter the username and password you set during the installation process and click on the “Log In” button. You will now have access to your WordPress dashboard, where you can customize your website, install themes and plugins, and manage your content.
Conclusion
Congratulations! You have successfully installed WordPress on your local machine. In this blog post, we covered the step-by-step process of installing WordPress using XAMPP. By following these instructions, you can set up a local development environment for your WordPress website. In the next video, we will explore the WordPress dashboard and learn about its different features. If you have any questions related to this tutorial, feel free to reach out to us on Facebook or Twitter. We’ll see you in the next video. Happy coding!