


Adding Google Maps in WordPress site
Integrating Google Maps in WordPress site can greatly enhance your website’s usability, providing visitors with visual and geographic context. Here, we will guide you through the step-by-step process of adding Google Maps IN WordPress site, even if you are a beginner.
Understanding the Importance of Google Maps
Adding Google Maps in wordpress site can boost user engagement and provide valuable information, particularly for businesses with physical locations. It aids in improving your local SEO and helps potential customers find you easily.
Step-by-Step Guide to Adding Google Maps in WordPress
1. Using the Google Maps Embed Code
One of the simplest ways to add Google Maps in WordPress site is by using the embed code provided by Google Maps.
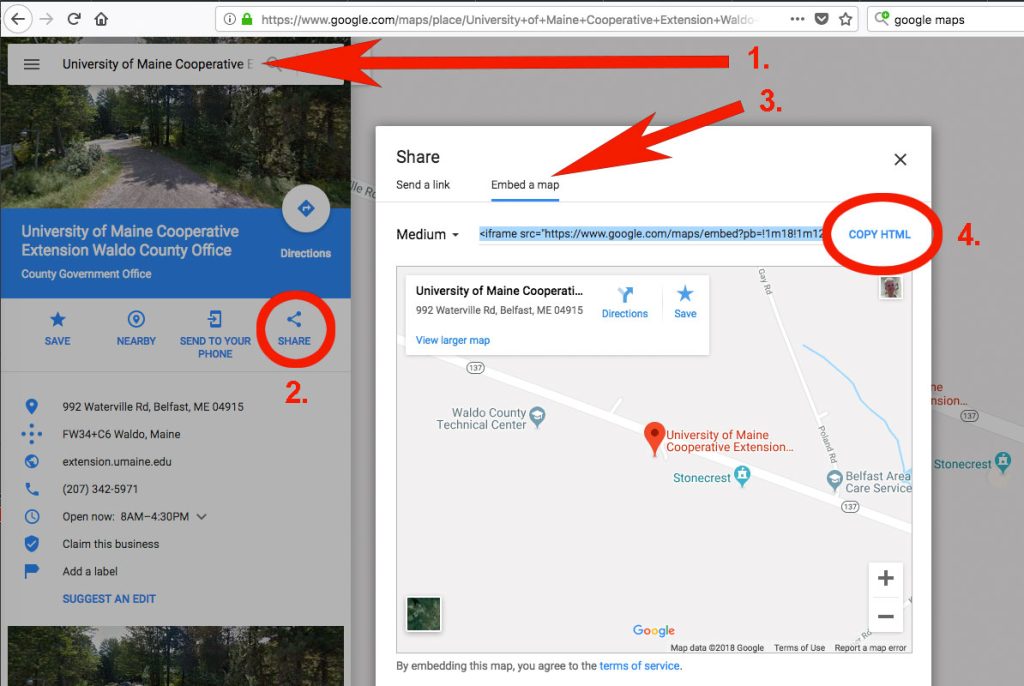
Step 1: Go to Google Maps
Visit Google Maps and enter the address you want to display on your website.
Step 2: Click on the Share Button
Once the location is displayed, click on the “Share” button on the left panel.
Step 3: Copy the Embed Code
In the share window, select the “Embed a map” tab. Adjust the size if necessary, then copy the HTML embed code.
Step 4: Paste the Embed Code in WordPress
Navigate to your WordPress dashboard. Open the page where you want to add the Google map. Go to the HTML editor and paste the embed code. Save or publish your changes.
2. Using a WordPress Plugin
Using a plugin can provide more features. Here are some of the best plugins to add Google Maps to your site:
Google Maps Widget
Google Maps Widget is a simple and user-friendly plugin that allows you to add maps to your site with ease.
Step-by-Step Instructions:
- Install and Activate the Plugin: Go to the WordPress dashboard, navigate to Plugins > Add New, and search for Google Maps Widget. Install and activate the plugin.
- Configure the Widget: Go to Appearance > Widgets. Find the Google Maps Widget and add it to your desired widget area.
- Enter Map Details: Fill in the required details such as the location address, map size, and zoom level.
- Save and Publish: Click Save to apply the changes.
WP Google Maps
WP Google Maps is another popular plugin that offers more customization options.
Step-by-Step Instructions:
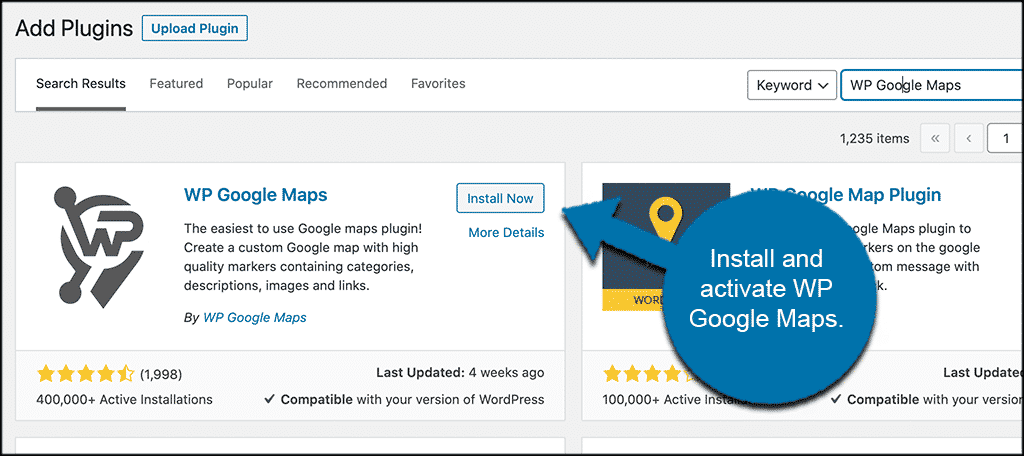
- Install and Activate the Plugin: Navigate to Plugins > Add New and search for WP Google Maps. Install and activate the plugin.
- Create a New Map: Go to Maps > Add New Map. Configure your map by entering the location, setting the map type, and adjusting other settings.
- Embed the Map: After saving the map, you’ll receive a shortcode. Copy this shortcode.
- Paste the Shortcode: Open the page or post where you want to display the map and paste the shortcode in the visual editor.
3. Using the Google Maps API
For advanced users, integrating Google Maps via the API offers extensive customization options.
Step-by-Step Instructions:
- Get an API Key: Go to the Google Cloud Platform and sign up for an API key. Allow the required APIs for your project.
- Install a Plugin for API Integration: Install a plugin like Advanced Custom Fields or MapPress Easy Google Maps which allows API integration.
- Configure the Plugin: Enter your API key in the plugin settings.
- Add a Map: Use the plugin’s features to add and customize your map.
Tips for Optimizing Your Google Maps Integration
1. Optimize for Mobile Devices
Ensure your map is responsive and looks good on mobile devices. Many plugins offer mobile optimization features.
2. Use Schema Markup
Implement Schema Markup for your maps to help search engines understand the context better. This can improve your local SEO.
3. Customize the Appearance
Customize the appearance of your map to match your website’s theme. Many plugins allow you to change colors, markers, and other elements.
4. Regularly Update Your Maps
Keep your maps updated with the latest information. If you move locations or have new contact details, reflect these changes on your map.
5. Monitor Performance
Use Google Analytics to monitor the performance of your embedded maps. Check how often users interact with the maps and adjust accordingly.
Common Issues and Troubleshooting
1. Map Not Displaying
If your google map is not show, check the following:
- Ensure you have entered the correct API key.
- Make sure the API is enabled.
- Check for plugin conflicts.
2. Slow Loading Times
If your map is causing slow loading times, consider the following:
- Optimize the map size and resolution.
- Limit the number of maps on a single page.
- Use a caching plugin to boost up your site.
3. Incorrect Location Displayed
If the incorrect location is displayed, double-check the address entered and ensure it is correctly formatted.
Conclusion
Adding Google Maps to your WordPress site can significantly enhance the user experience and improve your website’s functionality. Whether you opt for the simple embed code method, a versatile plugin, or advanced API integration, this guide provides a comprehensive approach for beginners. Follow these steps to seamlessly integrate Google Maps and provide your visitors with valuable geographical information.